Neon Lights
- Nad Hairuddin

- Mar 13, 2016
- 4 min read
Hello!
I wanted to do a bright eye using contrasting colours
and
since I'm making a point to use more GREEN this week..
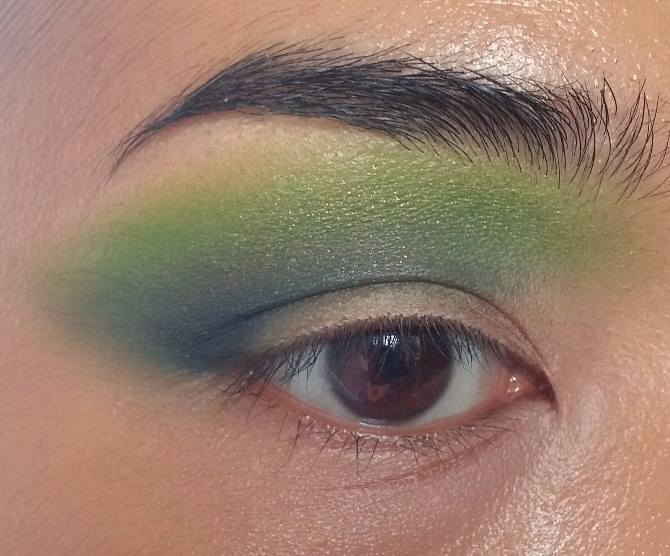
This was what I came up with :)

I'm gonna walk you through a little bit on how I achieved this eye look
and also list down all the products I had used..
Let's GO!
As usual, I always start off using toner, moisturizer, eye cream and sun screen on a cleansed face.
FOR FACE
Loreal Paris Base Magique Transforming Smoothing Primer
Sephora CC Cream
Nyx Concealer 3C Palette (Light - 01) - Yellow to spot conceal, Pink to brighten
Benefit Hello Flawless Oxygen Wow Brightening Makeup Liquid Foundation (Toasted Beige)
Models Prefer Argan Infusion Natural Foundation (Natural Beige)
I actually added Sephora CC Cream to my foundation, instead of a highliting primer, to get a thicker consistency. I liked how it turned out. Gave slightly more coverage without being too heavy on the skin.
Urban Decay Naked Skin Concealer in Light Neutral
Clinique Blended Face Powder (Invisible Blend - No.20) - to set
Sephora Eyeshadows (Blonde Ambition - No.71 & Girl's Night Out - No.03) - highlight
Bourjois Blush (Santal/ Sandalwood - 92)
NOW, let me walk you through the eyes..
First, using MAC Paint Pot in Soft Ochre all over the lid up to the brows to prime.
Then using a neutral eyeshadow to set the primer - I used Catrice Absolute Eye Colour Eyeshadow (Bring Me Frosted Cake - 090)
You will need all these coloured liners to boost the colour of the shadows,
I used,
- Light Green: Nyx Jumbo Eye Pencil in Rocky Mountain Green (624A)
- White: Nyx Jumbo Eye Pencil in Milk (604)
- Dark Green: Silky Girl Funky Eyelights Pencil in Ever Green (13)
- Red with a Pink undertone: MAC Pro Longwear Lip Pencil in Trust In Red

And these colours, I'm using from the Sephora Brilliant Makeup Palette..

1. Starting with the apple green ( Colour 1), blend this above the crease with a fluffy brush as a transition colour. It will be a wash of colour to start off before we intensify.
2. Then you're going to build the green up with Nyx's Rocky Mountain Green. Blending it out with the same fluffy brush.
Looking something like this..

Build that colour up so it will look like this..

It might look a little patchy at first, don't worry, just use the liner and dot the areas that you want to fill and blend it out.
3. Next, just set the liner with the apple green (Colour 1). Remember to just keep this above the crease so your colours don't get muddy.
4. Taking Silkygirl's Ever Green, I placed this on the outer corner of the eye in a 'V' shape, and blended it into the crease to get some definition.

5. Place the dark green shade (Colour 2) over top and blend it out in the crease and slightly upward above the crease.
It should start looking like this..
6. Now we're gonna work on the lid space starting with MAC's Trust In Red. Place it on the lid space and blend the edges smooth with a shading brush.
7. Do the same for Nyx's Milk but only at the inner corner of the eye and blend the edges.

8. In the center on the lid, we're setting the liners with the shimmery bronze (Colour 3), starting form the center of the lid, working it out towards the outer corner. You want the most deposit of colour at the center and less product to blend in with the green in the outer corner.
9. For the in inner corner, we're taking a majestic orange shimmer from The FaceShop (OR02) and pack it onto the white in the inner corner with a flat synthetic brush.
Don't you just love this orange?

10. To pull the look together, I used the chocolate brown (Colour 4) just below the dark green (Colour 2) in the crease there and blend it with the shimmery bronze (Colour 3) to get a better transition. Then put on some hot pink shadow (I actually used a pinkiest blush from the Brilliant Makeup Palette) just at the start of your nose contour and pop on gold highlight over top, blending down to the tear duct.
11. For the lower lash line, place the dark green (Colour 2) at the outer coner and blend over top with the apple green (Colour 1). Take the orange (OR02) and place it at the center, blending towards the tearduct and the gold highlight.
11. Finish off curling the lashes with a generous coat of masacara and the look is done!

I did put some single lashes just at the outer corner of the top lash line. You can go all out with full lashes if you so desire :)

I paired this look with a nude lip to balance out the bright eye and pop on some gold at the cupid's bow and at the center of the bottom lip for some plumping action.
And I'm ready to hit the town! :)
Hope you guys enjoyed this walk-through tutorial!
Stay tuned for more stuff brewing <3


Comments